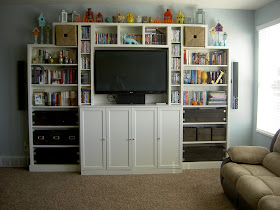
Bookcase Crates Tutorial:

Supplies:
-(18)5 ½ “X 6’ cedar fence boards ($1.97 each at Home Depot)
-(4) 2”x2x8’ furring strips ($1.52 each at Home Depot)
-(16) “L” brackets ($.67 each at Home Depot
-(6) metal label holders (I bought a package of 10 on Amazon.com for $11.99)
-finishing nailer gun + nails
-walnut stain
-sander
 Cut each of the cedar fence posts in half. Each strip should measure 2.5” X 6’.
 Next, cut those strips into the lengths desired.
 Cutting list for my crates:
Large Crates:
(9) 29.5” stripes (front, back, & bottom)
(6) 7” strips (sides)
(4) 8”- 2”X 2” strips (inside supports)
Small Crates:
(9) 9” stripes (front, back, & bottom)
(6) 7” strips (sides)
(4) 8”- 2”X 2” strips (inside supports)
 The easiest way to put these together is to nail the 2”X2”s to the three side slats. Then nail the front and back slats to the side pieces.
 Once the sides, front, and back slats have been nailed together, nail the bottom slats on.
 Next, sand, sand, sand.
 Once the crates have been sanded, they can be stained or painted.
  This product is awesome. We bought this aerosol can and jar at Home Depot for $5. I was able to spray the stain on all the crates instead of spending hours brushing it on.
 Finally, attach the “L” brackets. I used little black carpet nails. I think it adds a rustic feel.
  On the little crates, I added some metal label holders. I bought a package of 10 from Amazon.com for $11.99. Go HERE to purchase those. They will need to be spray-painted though...
***The metal holders pictured are ones I took off my filing cabinet. These will be traded out once the ones I bought from Amazon arrive. These are just to show what they will look like once they are finished. Unfortunately, I only had enough label holders for one side.***
I had a hard time trying to come up with a configuration for these. I moved them around a few times, then I finally settled on this. This way, when I have little visitors, they won’t be able to manhandle my stuff (can you tell I don’t have kids…) Anyway, I think it adds a lot to the look of the bookcases- a more mature look. I still need to figure out what to do with the top of the bookcases. I think it’s a little cluttered as it stands.


Go see these great blog posts that inspired my crates:
House of Smith’s
Shanty 2 Chic

Add to list of things you need: Handy and able/willing husband.
ReplyDeleteAlso, I LOVE how they turned out. One of my favorite projects of yours.
And lastly, Could you add some grown molding to the top of your bookcase? I say this as I'm looking at my blue bookcase with crown molding on the top. :) Either way that entertainment center looks fantastic!
And by grown I mean crown. Lol.
ReplyDeleteSuper cute Jessica! Love love love them! Those would be perfect for my bookshelves too....
ReplyDeleteSo cool! Love the tutorial as well. I featured you today! Hope you can check it out!
ReplyDelete