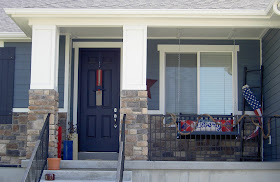
My entry was has given me problems since the day we moved in. It is a small, dark and enclosed area. For some reason or another, I have never been satisfied with this space... Until today!
A few weeks ago, I ordered this book on Amazon.
This book is so AWESOME! It is filled with hand drawn pictures of birds.
Since, I love birds, and this book was only $6, I decided to cut some of the pictures out and frame them.
I found these frames at Hobby Lobby for $6 a piece (80% off clearance section!!!)
I took the back off, and threw away the picture that came with the frame.
I took the picture I cut out of my book and taped it to the back of the mat in the frame.
Once I had all my pictures framed, I put them on my shelves.
Something was still missing though... After searching Pinterest and Google, I decided what I needed was a vintage looking sign.
I cut some wood. The wood plank I cut measures 5.25"x48". Since I wanted it to have nice finished edges, I decided to add some wood on the outsides. The little boards are similar to shims, but they come in 48" lengths. I got a bundle of them from Home Depot for $13. I found them by the corrugated roofing.
Once, I had all the wood cut, I painted my plank a cream color and the outside boards black.
I then stenciled the word "Aviary" onto the board in black paint.
Once it was dry, I sanded EVERYTHING.
Next, I nailed the sides on.
Finally, I added some picture hanging hardware...
Then I hung my sign above my newly framed bird pictures.
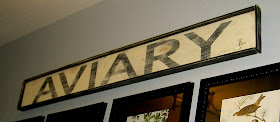
The sign turned out exactly how I imagined it!
Monday, June 25, 2012
Thursday, June 14, 2012
My Grandma's House: drab to fab
Soon after my grandma's death eight years ago, MY COUSIN AND HIS WIFE bought her 1930's bungalow. While they lived there, they made some great improvements:
Wednesday, June 13, 2012
Over-sized Fireworks
Over-sized Fireworks Tutorial:
Over-sized Fireworks supplies:
-(5)5 ½ “X 6’ cedar fence boards
-Cut(4)pieces of cedar fence board to 30 inches
Cut(4)pieces of cedar fence boards to 24 inches
-Cut(4)pieces of cedar fence board to 18 inches
-Cut(3)pieces of cedar fence board to 7 inches
-blue, red and cream paint
-paint roller
First thing you need to do is make the boxes.
Drill a hole in the middle of the top board piece. It needs to be big enough to fit a piece of rope in the hole.
Paint each box.
Dis-stress each box. This gives it an aged look.
Stick some rope through the hole you drilled. I had some star garland type stuff so I used that instead of rope.
Display!
Go HERE for the tutorial on how to make the Uncle Sam on my front door.
My patriotic front porch!
Monday, June 11, 2012
Flag Pillow + Etsy Adds
Flag Pillow Tutorial:
Cut a blue piece of fabric to 16"x25". Cut (2) 1.5"x12.5" strips of tan fabric (I used dropcloth material). Cut (2) 1.5"x25" strips of tan fabric. Cut (1) 2"x25" strip of tan fabric.
Next, pin the first tan strip of fabric two inches down from the top of the blue piece of fabric. Every 1.5 inches place a tan strip. The last strip is the 2" wide strip. The bottom of the tan strip should line up with the bottom of the blue piece of fabric.
Once everything is pinned in place, sew around each stripe.
Lastly, cut some stars out and sew those on as well. I sewed six stars on.
Sew right sides together with a 1/2 inch seam. Stuff the pillow, sew shut and Display!
You can purchase all the pillows in this post in my Etsy Shop.
Go HERE to visit my Etsy Shop.
Idea for Flag Pillow found HERE.
Tuesday, June 5, 2012
Uncle Sam + Patriotic Porch
Uncle Sam Door Hang Tutorial:
Uncle Sam Door Hang Supplies:
-(1)5 ½ “X 6’ pine board CUT to 34"
-(1) 1 1/4" x 48" piece of lath board CUT to 11 1/2"
-wood ball for the nose
-walnut stain
-blue, white, red and flesh color paint
-(2) black carpet nails for the eyes
-wooden star Paint the lath board blue and also a small square on the pine board. This will be Sam's hat.
Tape off sections on the hat, so you can make straight stripes. Paint the stripes to desired color.
Next, paint a small face under the blue, and paint the rest of the board white for a beard.
Dis-stress and stain the board. Wipe off excess stain with a paper towel.
I hammered in some small carpet nails for the eyes, but you could also use paint. Also, glue on the wooden ball for the nose.
Next, hook some wire onto the back, so you can hang it up and display.
Display!
The tutorial for the large fireworks will be posted soon.
Here are my pillows I made for the month of June/July. I LOVE the Liberty pillow. I made the star pillow out of a handkerchief I bought at Hobby Lobby for $2.
I found the idea of hanging a flag on a ladder on Pinterest.
Another porch shot.
Front yard shot of the porch. I love how is all came together!
Found idea for this HERE.